Ok, this first expeditionary post outlines an excellent process for producing some fine cannabis. It's a technique called deep water culture, a.k.a. aeroponics or "bubbling buckets". It is an very good method, especially if you are low on funds (as I usually am) or limited by space (that's me too). The concept is simple. You plant your youngins' in an inert adsorbent media such as grow rocks (I've found that equal parts aquarium gravel, perlite and vermiculite work just as well) in a plastic basket that sits over a reservoir with your nutrient solutions in it. For beginners, the poor or lazy people I recommend the water soluble Miracle-Gro products at 1/4 to 1/3 the recommended dilutions (tomatoes for veg and booster for flower) just make sure that your flush the crap out of the plants with fresh water for 2-3 weeks before harvest. You should defo use RO water for everything or else you'll get some nasty fungus and bacterial growth. I usually just buy it by the gallon, most grocery stores sell it (but make sure it says "reverse osmosis" on it, not distilled). As far as lighting goes, the sky is he limit. If your going small scale, like one personal use plant I like to go with a singe 50 watt high pressure sodium. It wont put put out as much bud but it's cheap, it doesn't put out much heat, its easily found at any chain style hardware store and it's easy on the electric bill. One way that I have increased yield is through creative pruning methods. I recommend a little scrog (screen of green) modification. Get one of those round trellises used for tomatoes and cut the bottom legs off and cut the top rings off after about 1.5 feet. Attach chicken wire over the top ring. Once your plant reaches 1 foot tall, cut off the grow tip (tiny budding leaves at the very top of the stalk). This will disrupt the release of a hormone that prevents the side branches from growing at a fast rate. You should then see a growth explosion and your plant will start to "bush" out. Once it gets to about 3 inches from the screen switch your lighting cycles over to 12 hours on and 12 hours off (flowering). Now the stems will elongate. Start to weave the young pliable stems in and out of the screen until you notice buds forming. Then let nature take its course. An oscillating fan is a necessity through out the entire length of the process and if growing on a small scale with lower light levels it is also important to trim away any excess foliage, especially if it is covering bud sites. After I get a good canopy going on the screen I actually remove all leaves on the stems beneath it. Well thats that. be sure to check back periodically for more useful information on subverting the government, staying informed and stickin' "IT" to tha Man.
Here is a good guide that outlines the process (thanks to BCseeds.com):
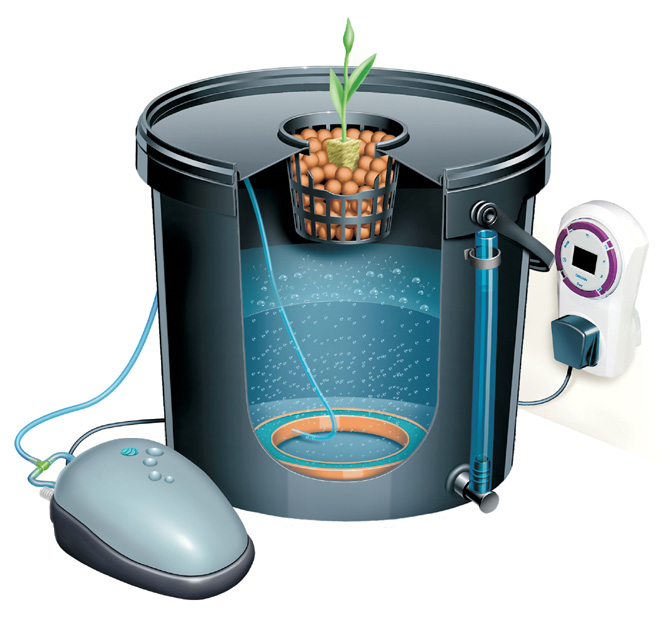
Hydroponics is the science of growing plants in a sterile medium.For the roots to flourish in a hydro system, there must be adequate water, nutrients, and oxygen. One of the easiest ways to start with hydroponics is simply to submerge the roots in a light nutrient solution and provide air in the solution with a small motorized pump. When done correctly, this method also is one of the most productive, capable of turning your average pot plants into monster indoor trees!
Deep Water Culture: from start to finish
In this how-to article, I will give you the plans, a workable nute ratio, and a schedule to complete a grow with the bubbling buckets. This is what has worked for me as of late-- there will always be variables from one garden to another which will require minor adjustments. These adjustments should be made gently! With DWC (deep water culture), the plants will react to any change much faster and the changes seem to affect the plants in a greater way. Your mileage will very depending on strain, lighting, nutes, etc. As for strain differences, it appears that no matter what the strain, there will be increased growth rates including the root mass! Therefore I would recommend that you maintain a sterile condition in both the buckets themselves as well as in the grow areas. Lack of diligence here will guarantee failure.
Selecting the bucket
This is a 3-gallon bucket that was found behind a hospital and previously contained fruit cocktail. Try to avoid any buckets which contained harmful chemicals, they may not come completely clean! Wash the bucket in a 10% bleach solution to ensure a sterile start. I also like to remove the handles. They're still easily picked up without them and they did tend to get in the way when left on. 3-gallons should be considered the minimum for bringing a plant to harvest with 5-gallons or more being preferable. Larger plastic tubs like those from Rubbermaid can be used but special attention should be paid to reinforcing them-- they're not meant to hold water. Double them up, one inside the other, or use a thicker container like a hydro reservoir.
Getting started with the lids
Cut the center of the lid out so a 6" net pot will drop in the opening. At the 3-o'clock position you will see a 1/4" hole towards the edge. That's for the airline. The net pots are available at most hydro stores, but you won't find them at Wal-Mart or Home Depot. Buy the heaviest-duty ones you can find. The reason I suggest the 6" is for plant stability when larger. You will need it, trust me! If you do choose to use smaller net pots you must secure them to the bucket so the plant does not tip over. Later you'll see a bucket with three 3.5" net pots in the lid. This is great for starting seedlings or clones in! 1-gallon per plant vs 3-gallons so you'll save on nutes and the number of buckets you
Preventing unwanted growth
You have to block the light or the buckets will fill with algae, and fast! Algae will choke the roots of necessary oxygen-- growth will slow and the roots will turn brown. You must make it light tight! I have used duct tape, but unless you used three wraps the light would still penetrate. I've since switched to using anti-corrosion pipe wrap tape purchased at a hardware store. The roll cost $8 US and will cover four 3-gallon buckets and lids. It's a vinyl tape that light can't pentrate and sticks well.
"I prefer the dual-outlet pumps for two reasons"
First, you have the ability to run two buckets in the early stages. I've heard of people using gang valves and running four to six buckets off of one pump. This may or not work, I'm no expert on exactly how much O2 is required in the solution for a healthy root system and plant. Second, I use a T so the dual outlet pump becomes a single outlet pump. I use one pump per bucket to insure plenty of O2 for the large root mass. At $14 US it will last for many grows and pay for itself in time. What's that equal to now, about 1 gr worth of product? Spend the money for a successful grow! The airstone I prefer to use are the small ones from Wal-Mart that run $.88 US. The reason being is the fine bubbles they produce. Sam Sara posted an article in referrence to fine bubbles suppling the most O2 to the solution vs powerheads or surface disturbance methods. Buy a couple extra as this is probably the most vulnerable part in the system. I've tried one of the 6" Bubble Curtains and didn't get as good of results. Also, there is a small lead fishing weight tied to the line at the stone to keep it on the bottom and in place. I'm sure I'll catch hell for using lead!
Medium or mediumless clones? My preference is rockwool starter cubes and gro-rocks or geolite. You could experiment with aeroponic rooting and ignore the rockwool altogether.
Nutrients and General Hydro ratios
This section is where the most testing and variations will be done by others! I use the GH Flora Series 3-part nutes. I also use the Pro-Tekt silcon additve and epsom salt in the solution. I start with distilled water due to water quality from a well that might not even be good for human consumption. I have tried RO water with no bad experiences and do plan on installing a RO filtering system soon. Either way, the ppm of the starting water is near 0. For seedlings and clones I use a 33% strength 1-1-1 solution. What I do is mix 1gal with 5ml Grow, 5ml Micro, and 5ml Bloom. Not in this order, as you have to add the micro first, but they list the solutions as G-M-B. I also add 5ml of Pro-Tekt and 1/4tsp of epsom salt. This goes into the bucket and an additional two gals of distilled are added. 10 drops of 70% Reagent Grade Nitric Acid bring the ph to 5.6 which is fine for me. I try and keep the ph in the 5.5-5.8 range and it will drift from the low 4s to the high 6s between changes depending on the plants useage of what nutes. For veg stage I use the same procedure for mixing to obtain the 33% solution strength. The difference being the ratio of the 3 parts. In veg stage I use the 3-2-1 mix which equals 15ml Grow, 10ml Micro and 5ml Bloom. The Pro-Tekt and epsom salt remain the same. Combine with 2 gals of distilled and adjust the ph to range. For the flowering stage it's the same routine and 33% solution strength. The ratio of the 3 parts are 5ml Grow, 10ml Micro and 15ml Bloom. The Pro-Tekt and epsom salt remain constant. Add two gals of distilled and adjust for ph range.
Keeping the water level
In my experience, the number one cause of failure was due to the nutrient levels maintained too high, at a level that allowed the rockwool cubes to contact the solution. What has worked well is to maintain the level about 1" above the bottom of the pot when using 6" net pots. In the triple 3.5" net pot buckets the level was about 1/2" above the bottom of the pot. There's no reason for concern when the levels drop below this point. I've had the level drop to a point that it took 2gals to bring it up to par. The air roots most likely thrive when the level drops in the bucket. For topping off the buckets I use the same solution as in the bucket at the same 33% solution strength. In the transition period from veg to flower I used a mix of 2-2-2 and in latter flower stages I have tried an aggressive formula of 0-2-4, both again at 33%. This is the area that will see the most changes by others. Everyone has their opinion on which nutes are the best and others will consider organics only. The most problems in the future will be with organics... These will take considerable monitoring and pre-bubbling to break down the organic nutes. Hope this has clarified the bubbling bucket for you. Get cracking and have fun
Here is a good guide that outlines the process (thanks to BCseeds.com):
Hydroponics is the science of growing plants in a sterile medium.For the roots to flourish in a hydro system, there must be adequate water, nutrients, and oxygen. One of the easiest ways to start with hydroponics is simply to submerge the roots in a light nutrient solution and provide air in the solution with a small motorized pump. When done correctly, this method also is one of the most productive, capable of turning your average pot plants into monster indoor trees!
Deep Water Culture: from start to finish
In this how-to article, I will give you the plans, a workable nute ratio, and a schedule to complete a grow with the bubbling buckets. This is what has worked for me as of late-- there will always be variables from one garden to another which will require minor adjustments. These adjustments should be made gently! With DWC (deep water culture), the plants will react to any change much faster and the changes seem to affect the plants in a greater way. Your mileage will very depending on strain, lighting, nutes, etc. As for strain differences, it appears that no matter what the strain, there will be increased growth rates including the root mass! Therefore I would recommend that you maintain a sterile condition in both the buckets themselves as well as in the grow areas. Lack of diligence here will guarantee failure.
Selecting the bucket
This is a 3-gallon bucket that was found behind a hospital and previously contained fruit cocktail. Try to avoid any buckets which contained harmful chemicals, they may not come completely clean! Wash the bucket in a 10% bleach solution to ensure a sterile start. I also like to remove the handles. They're still easily picked up without them and they did tend to get in the way when left on. 3-gallons should be considered the minimum for bringing a plant to harvest with 5-gallons or more being preferable. Larger plastic tubs like those from Rubbermaid can be used but special attention should be paid to reinforcing them-- they're not meant to hold water. Double them up, one inside the other, or use a thicker container like a hydro reservoir.
Getting started with the lids
Cut the center of the lid out so a 6" net pot will drop in the opening. At the 3-o'clock position you will see a 1/4" hole towards the edge. That's for the airline. The net pots are available at most hydro stores, but you won't find them at Wal-Mart or Home Depot. Buy the heaviest-duty ones you can find. The reason I suggest the 6" is for plant stability when larger. You will need it, trust me! If you do choose to use smaller net pots you must secure them to the bucket so the plant does not tip over. Later you'll see a bucket with three 3.5" net pots in the lid. This is great for starting seedlings or clones in! 1-gallon per plant vs 3-gallons so you'll save on nutes and the number of buckets you
Preventing unwanted growth
You have to block the light or the buckets will fill with algae, and fast! Algae will choke the roots of necessary oxygen-- growth will slow and the roots will turn brown. You must make it light tight! I have used duct tape, but unless you used three wraps the light would still penetrate. I've since switched to using anti-corrosion pipe wrap tape purchased at a hardware store. The roll cost $8 US and will cover four 3-gallon buckets and lids. It's a vinyl tape that light can't pentrate and sticks well.
"I prefer the dual-outlet pumps for two reasons"
First, you have the ability to run two buckets in the early stages. I've heard of people using gang valves and running four to six buckets off of one pump. This may or not work, I'm no expert on exactly how much O2 is required in the solution for a healthy root system and plant. Second, I use a T so the dual outlet pump becomes a single outlet pump. I use one pump per bucket to insure plenty of O2 for the large root mass. At $14 US it will last for many grows and pay for itself in time. What's that equal to now, about 1 gr worth of product? Spend the money for a successful grow! The airstone I prefer to use are the small ones from Wal-Mart that run $.88 US. The reason being is the fine bubbles they produce. Sam Sara posted an article in referrence to fine bubbles suppling the most O2 to the solution vs powerheads or surface disturbance methods. Buy a couple extra as this is probably the most vulnerable part in the system. I've tried one of the 6" Bubble Curtains and didn't get as good of results. Also, there is a small lead fishing weight tied to the line at the stone to keep it on the bottom and in place. I'm sure I'll catch hell for using lead!
Medium or mediumless clones? My preference is rockwool starter cubes and gro-rocks or geolite. You could experiment with aeroponic rooting and ignore the rockwool altogether.
Nutrients and General Hydro ratios
This section is where the most testing and variations will be done by others! I use the GH Flora Series 3-part nutes. I also use the Pro-Tekt silcon additve and epsom salt in the solution. I start with distilled water due to water quality from a well that might not even be good for human consumption. I have tried RO water with no bad experiences and do plan on installing a RO filtering system soon. Either way, the ppm of the starting water is near 0. For seedlings and clones I use a 33% strength 1-1-1 solution. What I do is mix 1gal with 5ml Grow, 5ml Micro, and 5ml Bloom. Not in this order, as you have to add the micro first, but they list the solutions as G-M-B. I also add 5ml of Pro-Tekt and 1/4tsp of epsom salt. This goes into the bucket and an additional two gals of distilled are added. 10 drops of 70% Reagent Grade Nitric Acid bring the ph to 5.6 which is fine for me. I try and keep the ph in the 5.5-5.8 range and it will drift from the low 4s to the high 6s between changes depending on the plants useage of what nutes. For veg stage I use the same procedure for mixing to obtain the 33% solution strength. The difference being the ratio of the 3 parts. In veg stage I use the 3-2-1 mix which equals 15ml Grow, 10ml Micro and 5ml Bloom. The Pro-Tekt and epsom salt remain the same. Combine with 2 gals of distilled and adjust the ph to range. For the flowering stage it's the same routine and 33% solution strength. The ratio of the 3 parts are 5ml Grow, 10ml Micro and 15ml Bloom. The Pro-Tekt and epsom salt remain constant. Add two gals of distilled and adjust for ph range.
Keeping the water level
In my experience, the number one cause of failure was due to the nutrient levels maintained too high, at a level that allowed the rockwool cubes to contact the solution. What has worked well is to maintain the level about 1" above the bottom of the pot when using 6" net pots. In the triple 3.5" net pot buckets the level was about 1/2" above the bottom of the pot. There's no reason for concern when the levels drop below this point. I've had the level drop to a point that it took 2gals to bring it up to par. The air roots most likely thrive when the level drops in the bucket. For topping off the buckets I use the same solution as in the bucket at the same 33% solution strength. In the transition period from veg to flower I used a mix of 2-2-2 and in latter flower stages I have tried an aggressive formula of 0-2-4, both again at 33%. This is the area that will see the most changes by others. Everyone has their opinion on which nutes are the best and others will consider organics only. The most problems in the future will be with organics... These will take considerable monitoring and pre-bubbling to break down the organic nutes. Hope this has clarified the bubbling bucket for you. Get cracking and have fun

No comments:
Post a Comment